
Reduce Mic background Noise for hardware version 4
The RRC:s of hardware version 4 was shipped in the begining of 2010. If you have a RRC1258MkII of hardware version 4 and are using a low level microphone you may hear a low level background noise together with outgoing mic audio. The noise is -120dBm but can be heard in some installations. The noise is generated by an OP-amp which is not good enough. This OP-amp is only mounted in hardware version 4, so if you have an other version or using a high level mic like ICOM microphones you do not have to bother about this.
How do I check the hardware version ?
Use your web browser to connect to the Status page in your Control RRC. On the fourth row there is the hardware version shown, for example.
Hardware 4
If you do not have hardware 4 you can stop reading now. For you with hardware version 4 who feels this is a problem the solution is quite simple, you just need to bypass the noisy Op-amp and use the Pre amp which is built in to the codec. You need a fine solder iron and a short piece of insulated thin wire and maybe a little piece of tin. Don’t use any soldering Braid or Pumps they may damage the pcb.
1. But first you have to check that you have firmware version 2.09 or later. If you do not update to a new firmware version. The firmware version is shown on the Info page, for example.
Software 2.09
2. Update the Radio RRC also to the same version.
3. Check that everything works like before.
4. When you have the right firmware installed and everything works OK. Disconnect all cables from the Control RRC and remove the top cover.
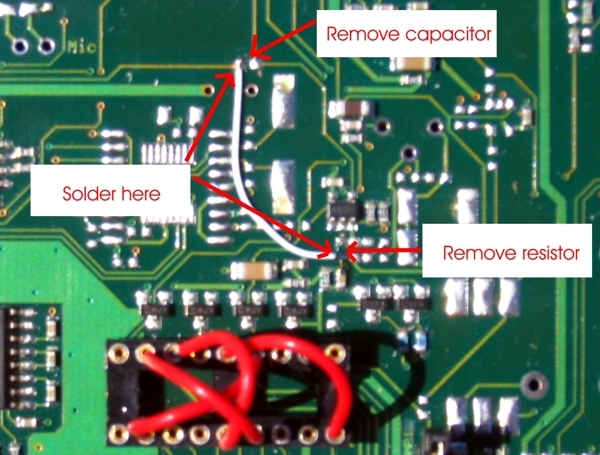
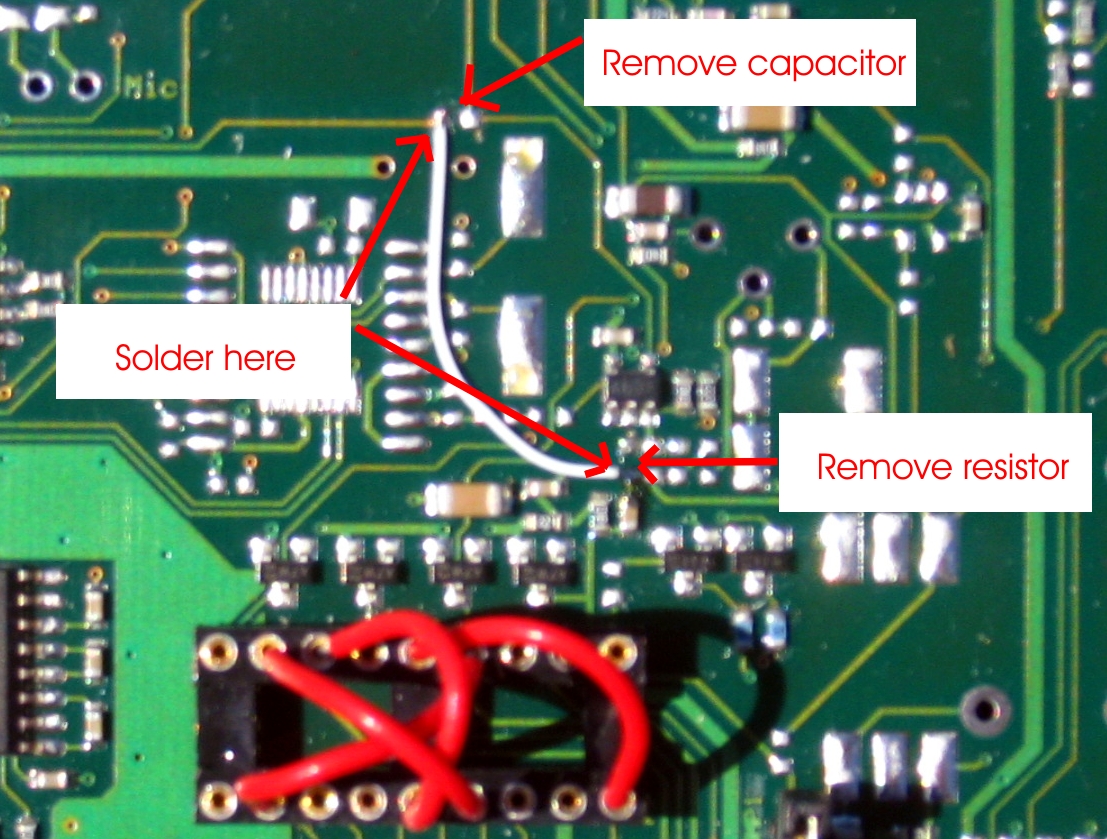
5. Look at the picture below and identify the marked components on the PCB.
2. Remove the capacitor by heating the ends of the capactior, alternate from left to right end staying a few seconds at each end until the component come loose.
3. Remove the resistor in the same way.
4. Solder the thin insulated wire between the solder pads as shown on the picture below.
5. Now it’s fixed, replace the covers and connect the cables.
6. Connect with your web browser to the Control RRC and go to the Radio settings page. Check that “Codec inp preamp” is set to Yes. “Submit” and “Apply changes”
7. Now you are ready to go on the air again.