
Microbit Setup Manager software
The initial settings of the network parameters like IP-number is easiest done via the Setup manager. The Microbit Setup Manager is a software which runs in your PC. The Manager connects to the RRC-1258, RRC-1258MkII, RRC-1258MkIIS, Webswitch 1216H and the Remote control RC-1216H via USB. A USB cable is supplied with the equipment
RRC-manager can be used for:
– Setting IP
IP-adress
Netmask
Gateway
DHCP (on/off)
– Read IP (if DCHP is used it could be useful)
– Searching and configure WiFi connections
– Upgrade firmware
Application
Bootloader
Start with downloading the latest version of Microbit Setup Manager.
News in v 2.06 Microbit Setup Manager_v2.06 2019-09-25
– Some bugfixes done
News in v 2.05 Microbit Setup Manager_v2.05 2019-03-30
– New Certificates (Sectigo)
News in v 2.03 Microbit Setup Manager_v2.03 2019-02-14
– Some small bugfixes done
– Note! Certificates expires, Can’t be used in new installations after 2019-04-19
News in v 1.31 Microbit Setup Manager_v1.31 2016-03-10
– Fixed a problem which caused wrong virtual serial port status.
News in v 1.30
– Fixed a problem which could cause the program to consider a device that was connected via USB being “disconnected”.
News in v 1.28
– New drivers for software only virtual com ports with fixes for Windows 10/8.1.
News in v 1.27
-Added a new feature (“Net info/find tab) which makes it easier to find and configure RRC/WS devices on the local network regardless of their IP addresses. Requires RRC version 2.79 and Webswitch/RC-1216H/AS-1269/AS1289 version 4.1 or newer.
News in v 1.26
– Fixed an compatibility issue with older RRC-firmware version.
News in v 1.25
– Better formatting of firmware version when having an older boot loader.
– Fixed a bug introduced in v1.24 which caused an error message when clicking the Setup tab in case of profiles not used in the RRC/WS.
News in v 1.24 beta
– New feature. It’s now possible to change the data in all profiles from the SetupManager, not only the default profile. (RRC v2.75 or WS 2.5 needed).
– New feature Support for installing on 64 bits Windows which requires signed drivers.
– Lot of fixes concerning the Virtual serial ports.
News in v 1.22
– Support for installing on 64 bits Windows which requires signed drivers.
– Added dialogs which informs about that the network setups(LAN+WiFi) are using the “default” profile regardless of currently active profile.
News in v 1.20
– Added support for detecting when an Remote Rig runs on USB power and then disable the Wi-Fi setup as well as pointing out that Net Info isn’t available then.
– Added support for showing Wi-Fi channels when scanning. Requires Remote Rig firmware 2.66 or newer.
News in v 1.19
– Bugfix. The Program now indicates that WiFi Scan is not posssible when the RRC is powered by USB-power. This has confused people who have tried to do WiFi Scan without the ordinarry 12VDC connected.
News in v 1.17
– Support for search and configure WiFi connections
– Some minor bugs are also fixed.
Note! The installer program has been changed from version 1.13, so if you are upgrading from version 1.12 or older you will have to uninstall the previous version manually before installing the new version.
News in v 1.13
– Prohibited profile selection when profiles haven’t been first-time initialised.
– Added possibility to see/change web server port.
– Added space trimming in setup texts.
– Added possibility to skip virtual COM port driver installation.
Note! The installer program has been changed from version 1.13, so if you are upgrading from version 1.12 or older you will have to uninstall the previous version manually before installing the new version.
News in v 1.12
– Support profile change in the RRC-1258.
– Bugfix: If you use USB for logging etc, Upgrade to this version.
News in v 1.11
– Support RC-1216H.
– FW/HW/Net information is now retrieved when the corresponding tab is clicked.
– Added possibility to change current profile in the RRC. Requires RRC firmware 2.44 or newer.
– Added possibility to change DNS server from the Setup Manager.
– The status window now shows the 8 last messages. The most current is shown in red.
Note ! If you have and older version installed and get into trouble when installing. Unistall the old version before installing the v1.11.
News in v 1.10
– Installs .inf files for all 4 Virtual USB com ports
News in v 1.9
– Fixed a possible unintentional change of MAC and serial number when changing setup info on two or more RRC:s after each other.
– Added more error codes and messages.
News in v 1.8
– Now with the possibility to update the bootloader also.
News in v 1.7b
– Changed name for temp catalogue to fool idiot virus detection softwares
News in v 1.7
– Minor fixes
News in v 1.6
– Minor fixes
News in v 1.5
– 1 st. version for both RRC and the WebSwitch
Install the Setup Manager by following the instructions which shows up. If you have a older operating system installed where .Net Framework 2.0 is not installed, the installer will guide you trough the installation of the Netframework
Install and use the Setup Manager
Before you can start to use your RRC-1258MkII you must strap them to fit your radio, how to do it you can read on resp. radio page. You must also configure them to fit into your IP-network before can start to make the rest of the configuring via the WEB-interface.
The initial settings of the network parameters like IP-number is easiest done via the USB-connections. When you do that you should take the chance to update to the latest firmware.
Start with downloading the RRC-Manager.
Install the RCC manager by following the instructions which shows up. If you have a older operating system installed where Netframework 2.0 is not installed, the installer will guide you trough the installation of the Netframework
When you have finished the installation a new shortcut to RRC-Manager will show up on the desktop.

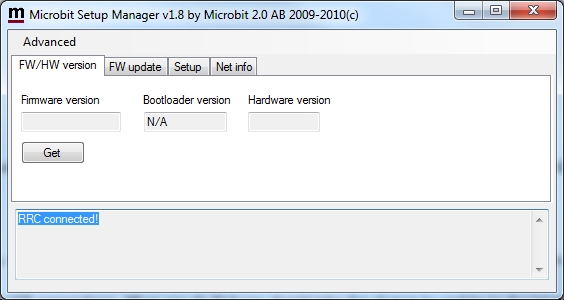
Connect your Control RRC ( the one with the CW-knob ) to 12V and connect the USB-cable (USB-A to Mini-USB) between your computer and the USB jack on the front of the RRC. Windows will automatically install the necessary drivers. When it’s done the text in the bottom field will change from “RRC not connected” to “RRC-connected” which is an indication that you are in connection with the unit.
FW/HW
Click on the “Get” button. The version of the built in firmware will show up in the upper window. Check the firmware page for a the latest firmware, if there is a newer software available download it to your desktop and unzip it. If you already have the latest version installed you can go directly to Setup down below, otherwise change to the “FW-update” tab in the RCC-manager.
FWW update
Click on the “Select file” and browse to the file you just saved to your desktop, the should be something like RRC-1258-CRC_v2.34_2011-03-14.bin depending on the version and release date.

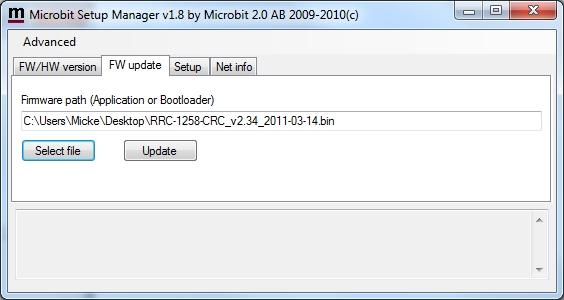
When you have find the file click on the “Update” button and the uploading of the file to the RRC will start.
Attention! do not interrupt the upgrade process in any way.
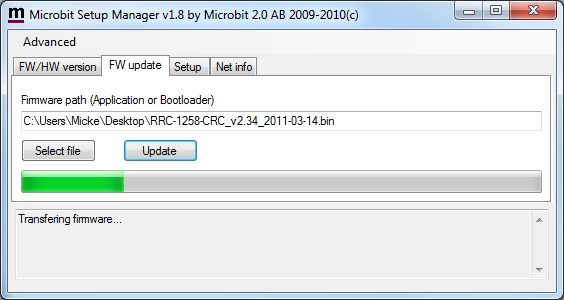
After about a 1 minut the update is finished and the RRC will restart. When the text “RRC-connected” shows up again in the lower field of the RCC Manager, you can change to the “FW/HW” tab again and check that the unit now shows the latest software version.
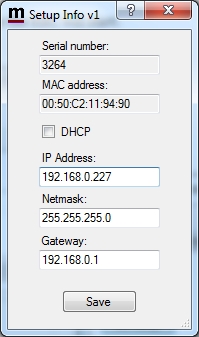
Now change to the “Get Setup” tab a new dialog window will show up with the default IP settings already there.
|
Change the settings so they fit into your local network and the press the “Save” button to save the new settings. The RRC will restart again. When the text “RRC-connected” shows up again in the lower field of the RCC Manager, you can click on the “Get Setup” button again to check that the changes has been done. The Control-RRC are now ready, do the same procedure for the Radio-RRC. After the initial settings are done on both unit check the Users manual for further instructions. |